

In two previous posts I showed how to use Ansible to configure an EC2 instance, after it was created. Even though that might be useful at times having a completely automated process that can be invoked directly from Cloudformation when the instance is being built could be even more useful. Such process could be used to prepare a new instance in an auto-scaling group or improve reliability of deployment into production environment (by making it completely automated).
Ansible in pull mode
Ansible is most frequently used in an interactive fashion - you start a playbook and as it runs through its tasks progress can be watched. But Ansible has also a far less known 'pull' mode. Original documentation is here: https://docs.ansible.com/ansible/latest/cli/ansible-pull.html but it doesn't really explain what's necessary in order to get it going.
Ansible in pull mode is almost the same as the 'regular' Ansible. The main difference is that before it runs it clones a repo from the specified URL. It also doesn't really need an inventory (it could be supplied, but I can't really think of a use case here).
Deployment key
In order to clone the repo ansible needs to be able to authenticate using an ssh key. That deployment needs to be upload to the git server. In case of Github the process to create one is quite simple:
- Using CLI (on Mac/Linux) generate an ssh key pair (I tend to name my deployment keys after the repo they're used for):
> ssh-keygen -t rsa -b 2048 -f ./ec2-base
Generating public/private rsa key pair.
Enter passphrase (empty for no passphrase):
Enter same passphrase again:
Your identification has been saved in ./ec2-base.
Your public key has been saved in ./ec2-base.pub.
The key fingerprint is:
SHA256:jgHUvmnpVDDLeDqpUno+Ry+RUbsm9Uu+q/QoY5h5zg0 pshemk@PshemsMac.local
The key's randomart image is:
+---[RSA 2048]----+
|    ..           |
|   .  =          |
|    .= =         |
|    o.B .        |
|     B.BS        |
|  . O O+o        |
| o *EXoo..       |
|o B.B+ooo        |
| +.*o++.+o       |
+----[SHA256]-----+
(it has to have no passphrase, otherwise it can't be used without human interaction)
2. Have a look at the public key:
> cat ./ec2-base.pub
ssh-rsa AAAAB3NzaC1yc2EAAAADAQABAAABAQC/5hGYFnx09WIfihv7LArhO9Feull3Fl/z9VElZiAik1dXcZPODGsGIzyBsIB8Tg6kFlE5+lopzreRRQYUuNj3MnKYPoMscX3Plv8LSq5PrMu6sTgqjT3/8fi0GxUZ62auhZIVHhDsXvGu1m8I2aXMeNST3m6RqLzw/m75Yczp4N4OD0SCJwIOklzEzdNGQ55sucOC/TrTTDZmB2D8M4Dd45e7tauNuQ39AbSKSjq1aysOShH17cdonoVebPaFtcjvbe3oKQtwO7j4437TbBQLLdcCxgE7/4c7Tfjyfzlwn96Rg9jnW053aRoeR3avmHDms5XjvMzCPSPr3/KT+Aj9 pshemk@PshemsMac.local
3. in Github - in your repo navigate to 'Settings' -> 'Deploy keys' -> 'Add deploy key':
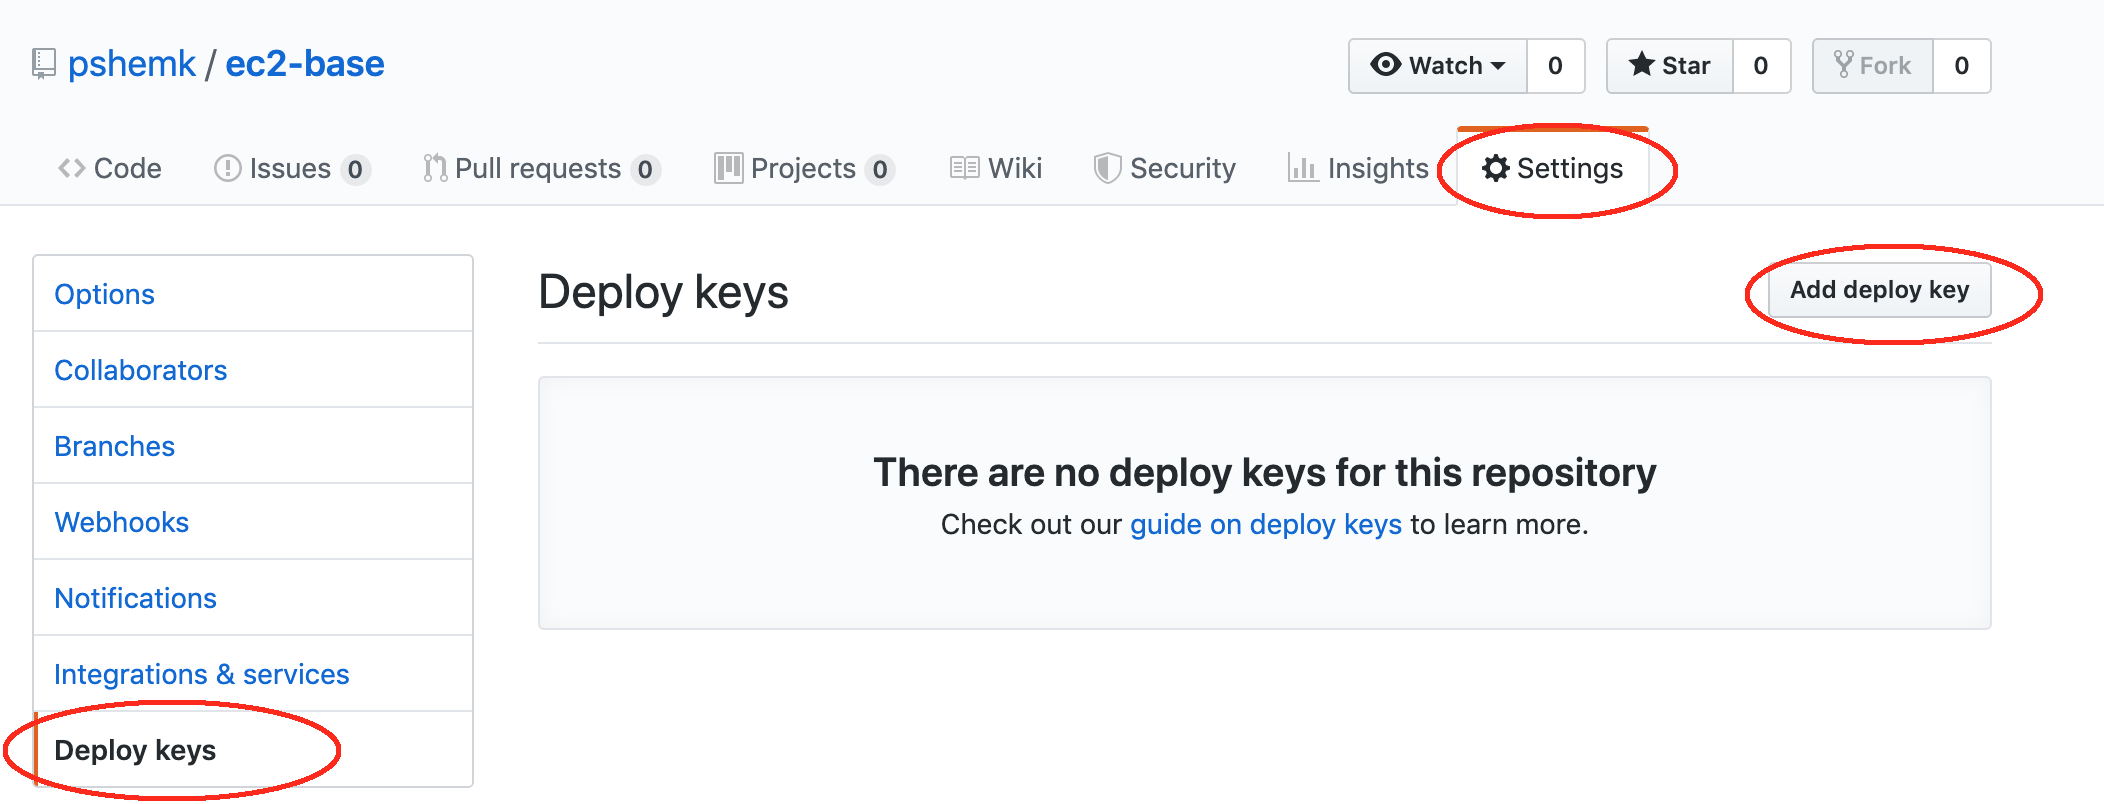
In the newly open window type the name of the key (for example 'instance-key') and paste the content of the public key. Do not tick 'Allow write access' and click 'Add key':
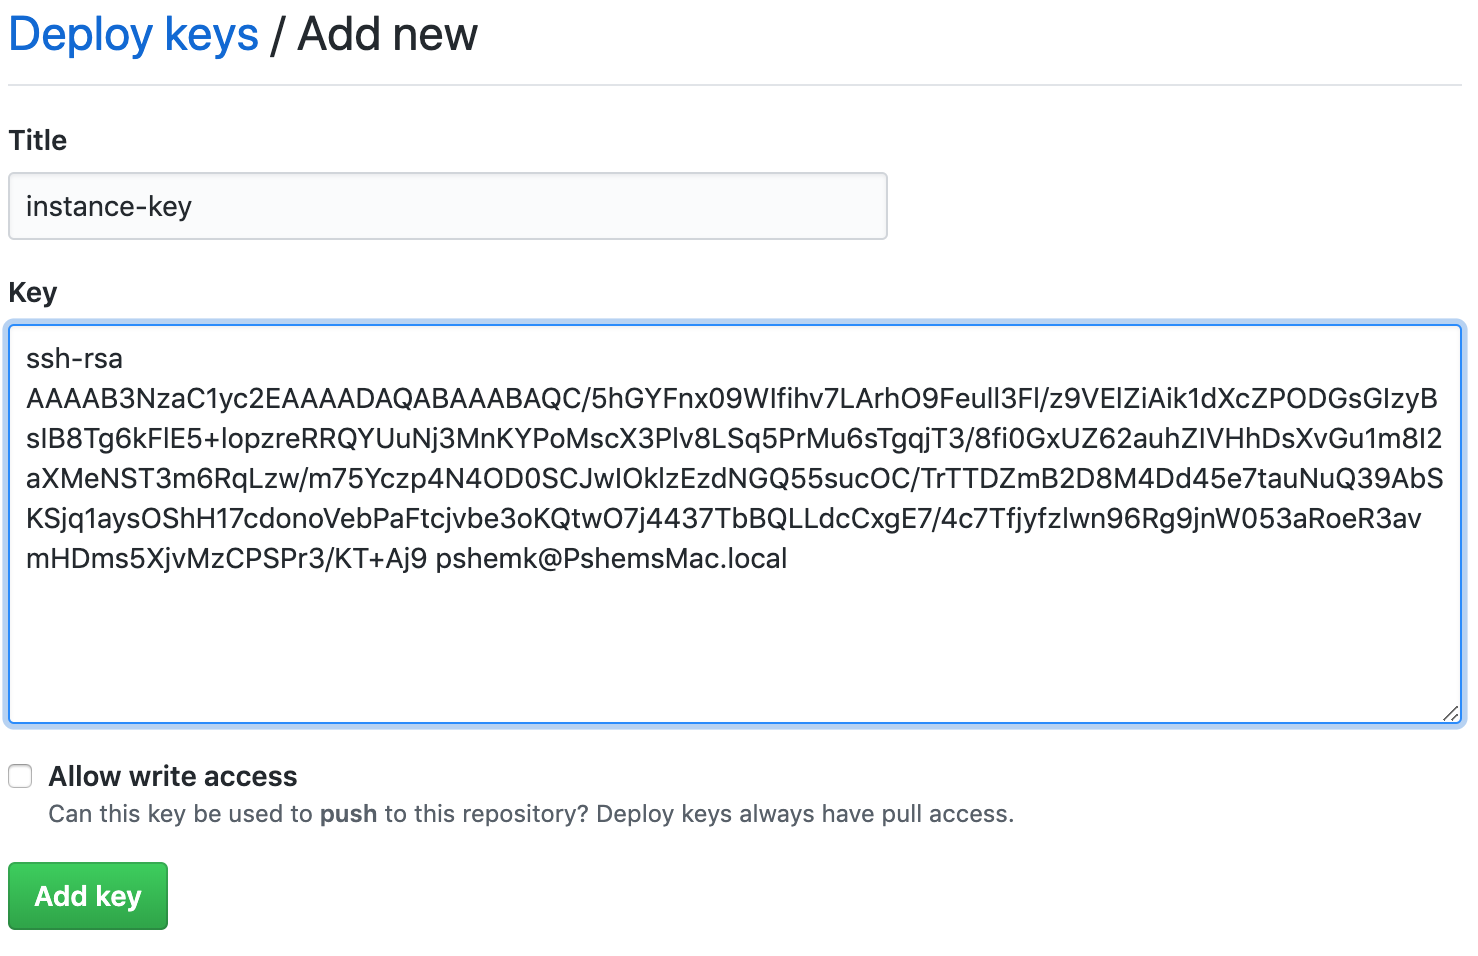
Now the repo can be cloned using an ssh key (but you still use https to clone it).
This can be manually tested (assuming the private key is stored in ~/ec2-base.key):
ansible-pull -C master -i localhost, -U https://github.com/pshemk/ec2-base.git --private-key=~/ec2-base.key setup_ec2.yaml(please note the , after the localhost)
Structure of the repo
The structure of the repo for Ansible in pull mode is exactly the same as for 'regular' Ansible, after all, once it gets downloaded the playbook gets executes locally on the machine as if it was there to start with.
One important thing to remember is to set the playbook to run against all hosts - since the target host won't really have an inventory, for example:
- name: setup ec2 instance
  hosts: all
  # become: true
  # user: ec2-user
  gather_facts: true
  roles:
   - ec2-base
become and user are not needed, since the playbook will be executed from cloud-init by root user.
CloudFormation
CloudFormation provides three mechanisms that allow to completely automate the deployment of an EC2 instance:
- ability to copy files to the instance (via
cfn-init) - execute any script via the UserData property
- signal back successful finish of the script (via
cfn-signal)
Copying file to the instance
We need to copy the deployment key onto the instance, so Ansible can clone the remote repo. I have explained the details of that process in my other post Copying files into an EC2 instance during bootstrap using CloudFormation, but I'll show the necessary config here too. Automatic copying of files requires 3 things:
- EC2 Instance Profile and Role that allows access to S3 bucket
- Metadata section in the AWS::EC2::Instance resource
- Invocation of
cfn-initscript on the instance (for example via the UserData property)
EC2 Instance Profile and Role for S3 access:
rEC2BaseRole:
    Type: AWS::IAM::Role
    Properties:
        AssumeRolePolicyDocument:
            Statement:
                - Effect: Allow
                  Principal:
                    Service:
                        - ec2.amazonaws.com
                  Action:
                    - sts:AssumeRole
        Path: "/"

rEC2BasePolicy:
    Type: "AWS::IAM::Policy"
    Properties:
        PolicyName: root
        PolicyDocument:
            Statement:
                - Effect: Allow
                  Action:
                    - ec2:DescribeTags
                    - ec2:DescribeVolumes
                    - ec2:DescribeInstances
                  Resource: "*"
                - Effect: Allow
                  Action:
                    - s3:ListBucket
                    - s3:GetObject
                    - s3:GetBucketLocation
                    - s3:ListAllMyBuckets
                  Resource:
                    - "arn:aws:s3:::*"
                    - "arn:aws:s3:::*/*"
        Roles:
            - Ref: rEC2BaseRole

rEC2BaseProfile:
    Type: "AWS::IAM::InstanceProfile"
    Properties:
        Path: "/"
        Roles:
            - Ref: rEC2BaseRole
        InstanceProfileName: "EC2BaseProfile"
Metadata section of AWS::EC2::Instance
The Metadata section provides both information on credentials that CloudFormation should use as well as the file(s) that should be copied into the newly built EC2 instance:
    Type: "AWS::EC2::Instance"
    Metadata:
        AWS::CloudFormation::Authentication:
              S3AccessCreds:
                type: "S3"
                roleName:
                    Ref: rEC2BaseRole
        AWS::CloudFormation::Init:
            configSets:
                init:
                    - repoKey
            repoKey:
                files:
                    "/root/ec2-base.key":
                        mode: '000400'
                        owner: root
                        group: root
                        source: "https://my-redacted-bucket.s3-ap-southeast-2.amazonaws.com/ec2-base"
                        authentication: "S3AccessCreds"
UserData section
In its simplest form the UserData property must contain the invocation of the cfn-init script:
    UserData:
      Fn::Base64:
            Fn::Sub:
             |
                #!/bin/bash -xe

                #pull in key file
                /opt/aws/bin/cfn-init -v --stack ${AWS::StackName} --region ${AWS::Region} --resource rTestInst --configsets init
but that's not sufficient to run Ansible, so read on.
If you wonder why there're -xe as options to bash - here's the explanation:
xruns the script in debug mode, so all commands are also outputted tostdout, which means they're visible in/var/log/cloud-init-output.logemeans that if any command invoked bybashreturns non-0 exit code - the whole script fails. I find it much easier to debug issues this way.
Ansible in pull mode
Ansible needs a few other packages and libraries, so they have to be installed prior to invoking ansible-pull:
- python (in this case python3)
- pip (so Ansible can be installed)
- git-core (so the repository can be cloned)
#!/bin/bash -xe

#install python3
yum -y install python3 python3-pip git-core

#install ansible
pip3 install ansible
Now that we have all the dependencies installed - we can execute ansible-pull:
#run ansible
/usr/local/bin/ansible-pull -C master --clean --purge -i localhost, -U https://github.com/pshemk/ec2-base.git --private-key=/root/ec2-base.key  -e 'ansible_python_interpreter=/usr/bin/python3' -vv setup_ec2.yaml
Details of the command line options are here: Ansible docs, the following ones are used above:
-C masteruse master branch of the repo--cleanre-download the content of the repo and discard any local modifications (helpful when troubleshooting and runningansible-pullby hand)--purgeremove the content of the repo once playbook has finished-U https://github.com/pshemk/ec2-base.gitURL of the repo to use-i localhost,the whole repository is a single host - localhost--private-key=/root/ec2-base.keydeployment key to use-e 'ansible_python_interpreter=/usr/bin/python3'forces Ansible to use Python3. Python2 now triggers a deprecation warning from Ansible. Setting Python executable is necessary since even when running using local connection Ansible still copies files to a temporary directory and executes from there using discovered Python interpreter. On Amazon Linux/bin/pythonstill points to version 2, so if any module needs a third-party library (for example boto3) it would have to be installed for Python2.-vvincreases the debug, which is always helpfulsetup_ec2.yamlis the name of the playbook to run (path is relative to root of the repo)
Signaling success to CloudFormation
For CloudFormation to actually wait for script to finish the instance has to be configured with a CreationPolicy (AWS Docs) that tells it to wait for a signal:
    CreationPolicy:
        ResourceSignal:
            Timeout: "PT15M"
In this case for 15 minutes.
So, once all the commands in UserData executed successfully (guaranteed by the -e option passed to bash) status can be signalled back to CloudFormation:
/opt/aws/bin/cfn-signal -e 0 --stack ${AWS::StackName} --region ${AWS::Region} --resource rTestInstThe resource name passed to cfn-signal must match the name of the AWS::EC2::Instance resource.
Putting it all together
The complete AWS::EC2::Instance definition is shown below (I've also added a dependent AWS::EC2::Volume which will be useful in the Troubleshooting section below).
rTestInst:
    Type: "AWS::EC2::Instance"
    DependsOn: rTestInstVolB
    Metadata:
        AWS::CloudFormation::Authentication:
              S3AccessCreds:
                type: "S3"
                roleName:
                    Fn::ImportValue:
                        Fn::Sub: "rEC2BaseRole"
        AWS::CloudFormation::Init:
            configSets:
                init:
                    - repoKey
            repoKey:
                files:
                    "/root/ec2-base.key":
                        mode: '000400'
                        owner: root
                        group: root
                        source: "https://my-redacted-bucket.s3-ap-southeast-2.amazonaws.com/ec2-base"
                        authentication: "S3AccessCreds"

    CreationPolicy:
        ResourceSignal:
            Timeout: "PT15M"
    Properties:
        AvailabilityZone:
            Fn::Sub: "${AWS::Region}a"
        InstanceType: "t3.nano"
        ImageId: "ami-04481c741a0311bbb"
        IamInstanceProfile:
          Fn::ImportValue: "rEC2BaseProfile"
        InstanceInitiatedShutdownBehavior: "stop"
        KeyName: "aws-dev"
        SubnetId:
          Fn::ImportValue: "rSubnetPublicA"
        SecurityGroupIds:
          - Fn::GetAtt:
              - rTestInstSG
              - GroupId
        Tags:
            - Key: "Name"
              Value: "testInstance"
            - Key: "Account"
              Value:
                Ref: AWS::AccountId
        Volumes:
          - Device: "/dev/xvdb"
            VolumeId:
              Ref: rTestInstVolB
        UserData:
          Fn::Base64:
                Fn::Sub:
                 |
                    #!/bin/bash -xe

                    #install python3
                    yum -y install python3 python3-pip git-core

                    #install ansible
                    pip3 install ansible

                    #pull in key file
                    /opt/aws/bin/cfn-init -v --stack ${AWS::StackName} --region ${AWS::Region} --resource rTestInst --configsets init

                    #run ansible
                    /usr/local/bin/ansible-pull -C master --clean --purge -i localhost, -U https://github.com/pshemk/ec2-base.git --private-key=/root/ec2-base.key  -e 'ansible_python_interpreter=/usr/bin/python3' -vv setup_ec2.yaml

                    #signal back to CloudFormation
                    /opt/aws/bin/cfn-signal -e 0 --stack ${AWS::StackName} --region ${AWS::Region} --resource rTestInst

rTestInstVolB:
    Type: "AWS::EC2::Volume"
    Properties:
      AvailabilityZone:
        Fn::Sub: "${AWS::Region}a"
      Size: 1
      VolumeType: "gp2"
      Tags:
        - Key: "Name"
          Value: "TestInst"
        - Key: "Account"
          Value:
            Ref: AWS::AccountId
Troubleshooting
There is a lot that can go wrong during the automated deployment of an EC2 instance, so below I've collected some tips that can help here.
Set reasonable timeouts
Not strictly a troubleshooting advice. After trying the deployment a few times you should have a good idea on how long it can take to run the playbook - use that value (plus some margin) as a parameter into CreationPolicy. This can help in case of complex CloudFormation templates with many resources, so a failure is caught quickly.
Have a look at the cloud-init logs
Cloud-init logs are located in /var/log/cloud-init-output.log. Passing -x to bash ensures that you can see what commands are being executed, for example (note the + before the command):
...
+ yum -y install python3 python3-pip git-core
Loaded plugins: extras_suggestions, langpacks, priorities, update-motd
...
+ /opt/aws/bin/cfn-init -v --stack testInst --region ap-southeast-2 --resource rTestInst --configsets init
+ /usr/local/bin/ansible-pull -C master --clean -i localhost, -U https://github.com/pshemk/ec2-base.git --private-key=/root/ec2-base.key -e ansible_python_interpreter=/usr/bin/python3 -vv setup_ec2.yaml
ansible-pull 2.8.1
...
You might need to increase the timeout on CreationPolicy so the instance is not destroyed by CloudFormation before you have a chance to troubleshoot.
Run the playbook by hand
By default the repo gets cloned into /root/.ansible/pull/$hostname/, so it's possible to run the playbook by hand (you need to remove --purge option from invocation of ansible-pull for the repo to be preserved):
/usr/local/bin/ansible-playbook -i localhost, -e 'ansible_python_interpreter=/usr/bin/python3' -c local -vv setup_ec2.yamlMake sure there are no race conditions between resources
CloudFormation tries to create resources as quickly as possible, often in parallel. For example that means that AWS::EC2::Instance and its AWS::EC2::Volume are created at the same time, which means that when the instance is executing its cloud-init the volume might not be ready (and attached yet).
Make sure the network is ready
If the playbook or some packages require network connectivity - make sure it's actually there when the instance is being built. If the instance is in a public subnet, but the subnet doesn't automatically allocate public IPs, but instead relies on Elastic IPs - the instance won't be able to download anything.
Credits
header photo by Jakob Braun