

If you're running a Kubernetes cluster with workloads that need access to AWS services you probably wondered what's the best way of granting that access. There are number of solutions that can be deployed:
- Use static user credentials
- If the cluster is running in AWS - use EC2 instance profile
- Use projects like kiam or kube2iam
- Use AWS IAM with web-federated identities using OIDC to authenticate
The first option is not great - rotating those credentials is not always easy, in addition to that they have to be stored somewhere and provided to the workload.
Second option is slightly better, but the major issue here is that any Pod running on the EC2 instance gets access to all the resources specified in the role associated with the instance profile. That's not something that works well from security perspective.
The third option are the well established projects that work by intercepting calls to the STS endpoint. They work well, but can't be easily used outside of the AWS environment. These two projects were started before Kubernetes had an OIDC provider.
Finally - the last option offers the best solution - the credentials get automatically allocated using AWS STS, they are short-lived, and what's best - they can be tailored to an individual workload requirements. This solution can also be made to work with no additional software running on the cluster (or the node).
How OIDC in Kubernetes actually works?
Diagram below shows the key components involved in making it all work.
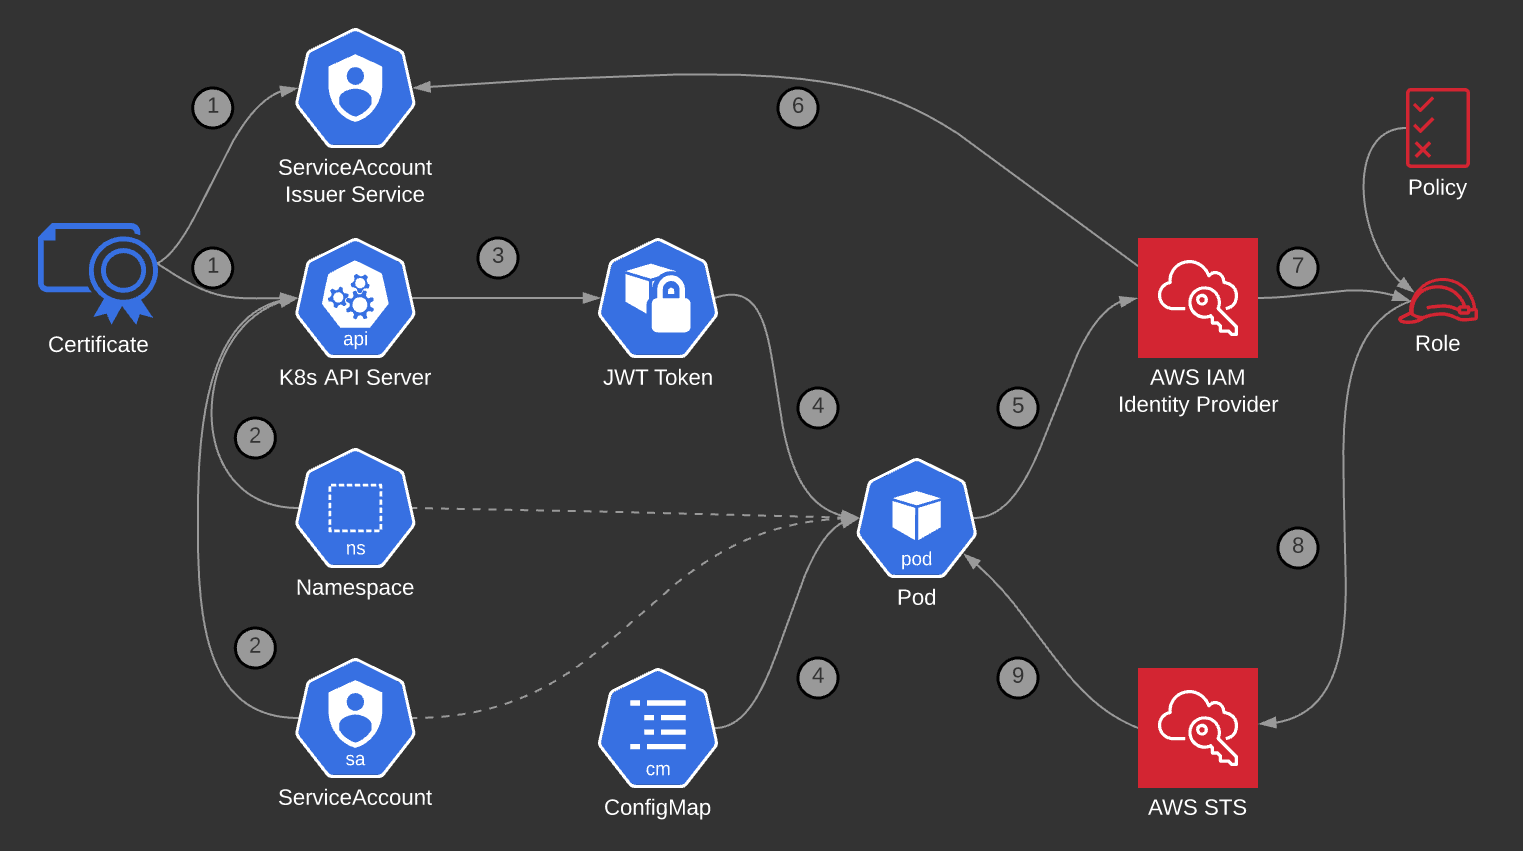
- Kubernetes cluster uses an internal signing key for both
Service Account Issuer Discoveryand theAPI. - When a new
Podis being scheduled theAPInotes down theNamespaceandServiceAccount. - Using that information the
APIgenerates anJWTtoken and signs it using the internal signing key. - That token is mounted into the newly created
Pod. AConfigMapprovides an environmental variable with the token location and AWS Role to assume. - Application inside the
Podmakes ansts:AssumeRoleWithWebIdentitycall to AWS OIDC Identity provider (using the token provided). - The OIDC Identity provider fetches (using HTTPS) information from the
Service Account Issuer Discoveryto confirm the authenticity of the token. - The IAM assumes the requested role (which uses a supplied policy).
- STS generates short-term credentials based on the information provided.
- The short credentials are returned to the application inside the
Pod.
Making it work
The great thing is that modern versions (1.21 and newer) of Kubernetes contain all the necessary components out of the box, it's just a matter of configuring it. For older version - 1.20 it's still possible to make it work with a bit of manual workaround.
Service Account Issuer Discovery
This components gets enabled when the following flags are set on the kubeapi-server:
--service-account-issuer--service-account-key-file--service-account-signing-key-file--api-audiences
Where:
| flag | sample value | notes |
|---|---|---|
service-account-issuer |
https://my-sample-oidc-bucket.s3-ap-southeast-2.amazonaws.com |
where the AWS Identity provider can find OIDC details |
service-account-key-file |
/var/lib/k0s/pki/sa.pub |
Public portion of the key used for verfication of tokens |
service_account_signing-key-file |
/var/lib/k0s/pki/sa.key |
Private portion of the key used for signing tokens |
api-audiences |
kubernetes.svc.default |
must match audience in the AWS Identity provider, can be overriden on by-pod basis |
When those flags are enabled the Service Account Token Volume Projection is also enabled. That service is necessary for the tokens to be visible inside the pods.
Service Account Issuer Discovery component is responsible for providing information confirming authenticity of the token. In practical terms it's a very simple web server that returns two static document (as per OIDC specification):
- openid-configuration (at
/.well-known/openid-configuration) - keys (at
/.keys.json)
By default, it's served by the API endpoint, and as a result of that - it needs authentication. There are two ways of exposing this information:
- removing authentication from this service
- copying the information to public web server (for example an S3 bucket)
Exposing the API doesn't sound like a good idea for a production setup, but if you want to try it quickly - the following snipped must be applied to the cluster to remove authentication from those two URLs above.
apiVersion: rbac.authorization.k8s.io/v1
kind: ClusterRoleBinding
metadata:
  name: service-account-issuer-discovery-public
roleRef:
  apiGroup: rbac.authorization.k8s.io
  kind: ClusterRole
  name: system:service-account-issuer-discovery
subjects:
  - kind: Group
    name: system:unauthenticated
But what's in those files? The openid-configuration provides the JWT information, such as encryption algorithms, supported claims and location of the keys:
{
  "issuer": "https://my-sample-oidc-bucket.s3-ap-southeast-2.amazonaws.com/",
  "jwks_uri": "https://my-sample-oidc-bucket.s3-ap-southeast-2.amazonaws.com/keys.json",
  "authorization_endpoint": "urn:kubernetes:programmatic_authorization",
  "response_types_supported": [
    "id_token"
  ],
  "subject_types_supported": [
    "public"
  ],
  "id_token_signing_alg_values_supported": [
    "RS256"
  ],
  "claims_supported": [
    "sub",
    "iss"
  ]
}
and keys.json provides the public key (or keys) used:
{
  "keys": [
    {
      "use": "sig",
      "kty": "RSA",
      "kid": "vVjAlo3uG1TsVP46Sy1Htv8rK7bKdho0rDMeiQpSJD4",
      "alg": "RS256",
      "n": "uahgtoVsMJb5x7lRCPGVYZ2hgWWea-fYwEKaxAy8m6BcDH6vOXZNQJBY8Jof24shOP5g_smfHaC6n2H7ydZdJNw-ciRc3JJNiLDDJnylMfwZlR2YZc2XK3b15_1m-YGQEmrmJcjInRqSa5h8jYZpaDfdYAj_ExQ61RK7JNZC-83C_7wywwK1CkHMuTpILazXuCiOMFXuJU-PCV7caGIDVKSu4Ugbb0DZA9XhNL1L9rOq25xxWUnFaeGTkxPny2gwjj0VskXjP4L5sLDnpZ8VBFgG-W5UJHDqg7B0tX_WG2nzA8W6f_BTTT3WlC97Tfi-mTXdNYruvMpEjDAC0qiQmw",
      "e": "AQAB"
    }
  ]
}
If you're using kubernetes 1.20 - there's information at the end of this post on how to generate the content of keys.json file manually.
Service Account
Service account can be very simple. The key thing about it is that its name is used to verify access to the IAM role.
apiVersion: v1
kind: ServiceAccount
metadata:
  name: "test-pod-sa"
Pod's environment
Pod's environmental variables are used to tell the application where to find the token, which region to use and most importantly - which role to assume.
apiVersion: v1
kind: ConfigMap
metadata:
  name: "test-pod-config-map"
data:
  AWS_DEFAULT_REGION: ap-southeast-2
  AWS_ROLE_ARN: "arn:aws:iam::111111111111:role/test-pod-sa@default"
  AWS_WEB_IDENTITY_TOKEN_FILE: /var/run/secrets/k8s-aws/serviceaccount/token
Pod's setup
The pod's specification needs to mount the token and set up the environmental variables. The token is mounted using a projection.
apiVersion: v1
kind: Pod
metadata:
  name: test-pod
  namespace: default
spec:
  containers:
  - command:
    - sleep
    - "604800"
    image: alpine:latest
    imagePullPolicy: Always
    name: test-pod
    envFrom:
    - configMapRef:
        name: "test-pod-config-map"
    volumeMounts:
    - mountPath: "/var/run/secrets/k8s-aws/serviceaccount/"
      name: aws-token
  serviceAccountName: "test-pod-sa"
  volumes:
     - name: aws-token
       projected:
          sources:
            - serviceAccountToken:
               path: token
               expirationSeconds: 600
               audience: "cluster.identifier.kubernetes.domain"
The audience in the token specification must match what's configured in the AWS IAM Identity provider. The mountPath must match what's supplied in the ConfigMap in the AWS_WEB_IDENTITY_TOKEN_FILE.
AWS IAM Identity provider
In order to configure the Identity provider - head to the IAM service, select Identity Providers from the menu on the left and click the blue 'Add provider' button on the right. On the next page select OpenID Connect and fill in the details: the URL where the two OIDC files can be found and the audience to use:
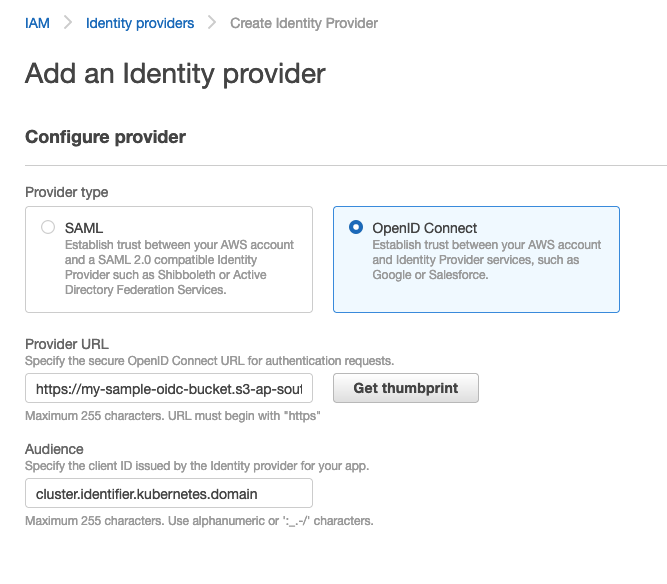
Then click 'Get thumbprint' and 'Add provider' at the bottom.
AWS IAM Roles
Some consideration must be given to the naming of the IAM Roles. Ideally, each workload should use its own role. I decided to include the ServiceAccount name and the Namespace names in the roles for easy identification.
Now, in AWS web console, click Roles and 'Create Role'. On the next page select 'Web Identity` and select your newly created identity provider and audience:
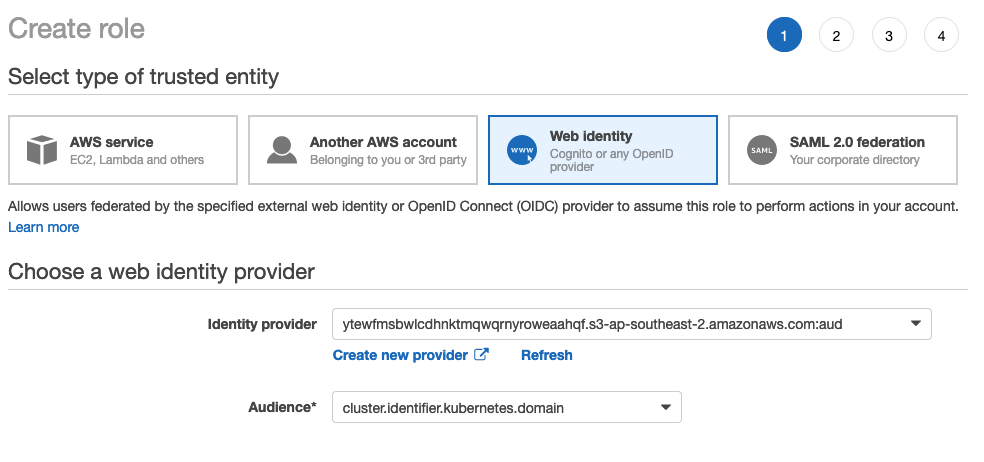
Select a sample policy (for example 'ReadOnlyAccess'):

Give the role a name on the next page. Once the role is created - click it and navigate to 'Trust Relationship' and click 'Edit trust relationship':
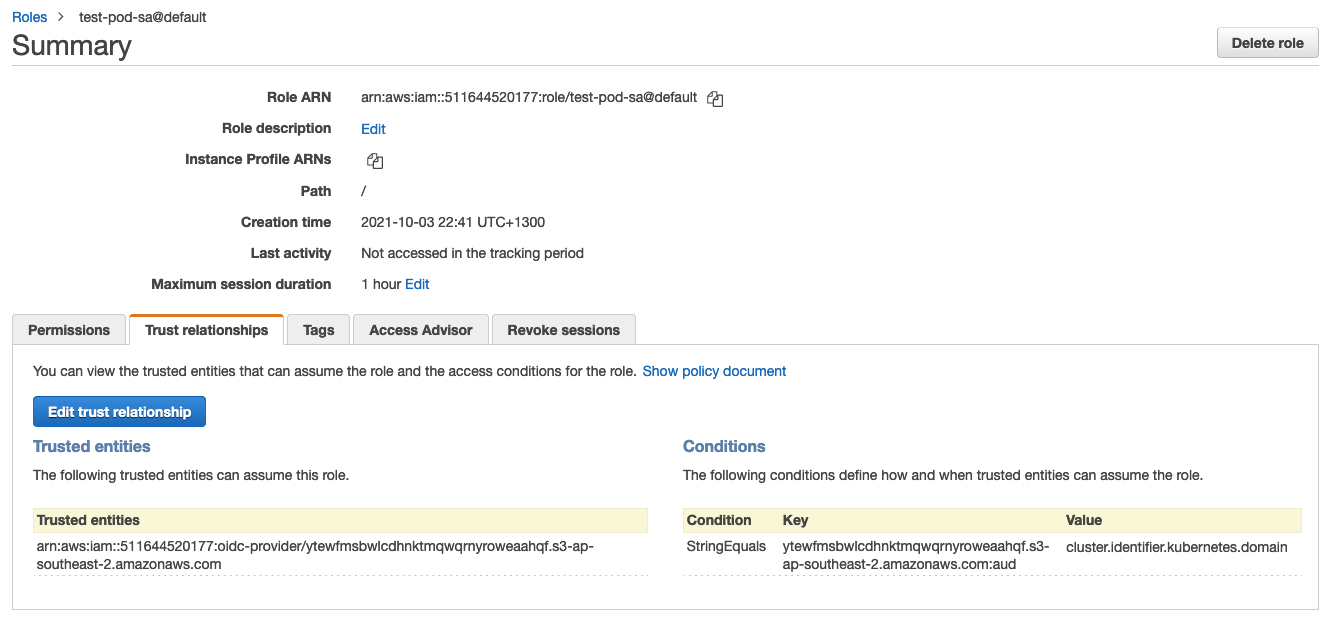
by default, the role matches if the audience alone matches, which is too broad for most needs. We have to modify it to match the sub (i.e. OIDC Subject) with the combination of ServiceAccount and Namespace:
{
  "Version": "2012-10-17",
  "Statement": [
    {
      "Effect": "Allow",
      "Principal": {
        "Federated": "arn:aws:iam::111111111111:oidc-provider/my-sample-oidc-bucket.s3-ap-southeast-2.amazonaws.com"
      },
      "Action": "sts:AssumeRoleWithWebIdentity",
      "Condition": {
        "StringEquals": {
          "my-sample-oidc-bucket.s3-ap-southeast-2.amazonaws.com:sub": "system:serviceaccount:default:test-pod-sa"
        }
      }
    }
  ]
}
The sub takes a fixed format:
- prefix
system:serviceaccount: Namespacename and a:ServiceAccountname
I know that doing this sort of configuration manually is not really scalable. Later in this post there's information on how to configure the AWS resources using Terraform.
JWT Token
Once the Pod is launched (using the specification shown above) we can have a look at the token inside it:
$ kubectl exec -it test-pod -- /bin/sh
/ # cat /var/run/secrets/k8s-aws/serviceaccount/token
eyJhbGciOiJSUzI1NiIsImtpZCI6InZWakFsbzN1RzFUc1ZQNDZTeTFIdHY4cks3YktkaG8wckRNZWlRcFNKRDQifQ.(...)rN4OE_zAA/
Content of that token can be decoded using https://jwt.io/:
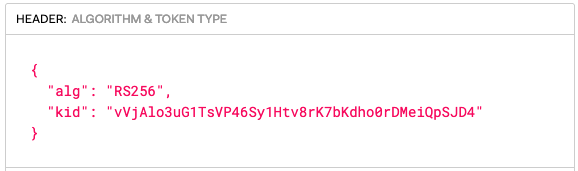
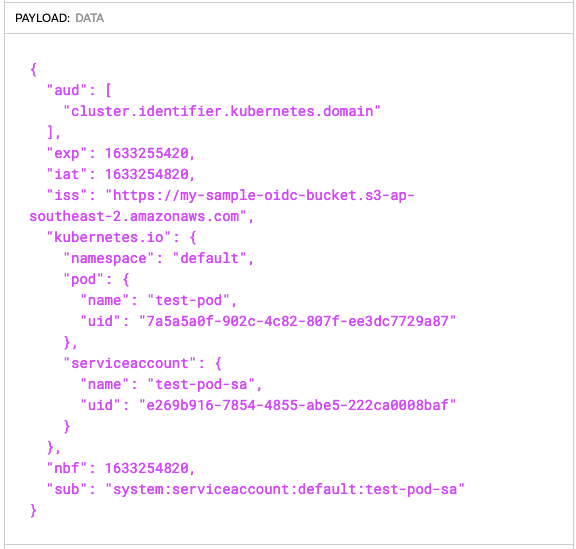
Verification
Finally - we install aws-cli :
/ # apk update && apk add aws-cli
fetch https://dl-cdn.alpinelinux.org/alpine/v3.14/main/x86_64/APKINDEX.tar.gz
fetch https://dl-cdn.alpinelinux.org/alpine/v3.14/community/x86_64/APKINDEX.tar.gz
v3.14.2-68-gbf3cc5c973 [https://dl-cdn.alpinelinux.org/alpine/v3.14/main]
v3.14.2-67-gf34feae70e [https://dl-cdn.alpinelinux.org/alpine/v3.14/community]
OK: 14938 distinct packages available
(1/27) Installing libbz2 (1.0.8-r1)
(2/27) Installing expat (2.4.1-r0)
(3/27) Installing libffi (3.3-r2)
(4/27) Installing gdbm (1.19-r0)
(5/27) Installing xz-libs (5.2.5-r0)
(6/27) Installing libgcc (10.3.1_git20210424-r2)
(7/27) Installing libstdc++ (10.3.1_git20210424-r2)
(8/27) Installing mpdecimal (2.5.1-r1)
(9/27) Installing ncurses-terminfo-base (6.2_p20210612-r0)
(10/27) Installing ncurses-libs (6.2_p20210612-r0)
(11/27) Installing readline (8.1.0-r0)
(12/27) Installing sqlite-libs (3.35.5-r0)
(13/27) Installing python3 (3.9.5-r1)
(14/27) Installing groff (1.22.4-r1)
(15/27) Installing py3-six (1.15.0-r1)
(16/27) Installing py3-dateutil (2.8.1-r3)
(17/27) Installing py3-docutils (0.16-r3)
(18/27) Installing py3-jmespath (0.10.0-r1)
(19/27) Installing py3-urllib3 (1.26.5-r0)
(20/27) Installing py3-botocore (1.20.93-r0)
(21/27) Installing py3-s3transfer (0.4.2-r0)
(22/27) Installing py3-colorama (0.4.4-r1)
(23/27) Installing yaml (0.2.5-r0)
(24/27) Installing py3-yaml (5.4.1.1-r1)
(25/27) Installing py3-asn1 (0.4.8-r1)
(26/27) Installing py3-rsa (4.7-r2)
(27/27) Installing aws-cli (1.19.93-r0)
Executing busybox-1.33.1-r3.trigger
OK: 136 MiB in 41 packages
And check STS caller identity:
/ # aws sts get-caller-identity
{
    "UserId": "AROAXOIDDZ3Y62IIKMTXY:botocore-session-1633255316",
    "Account": "111111111111",
    "Arn": "arn:aws:sts::111111111111:assumed-role/test-pod-sa@default/botocore-session-1633255316"
}
/ #
This confirms that the Pod successfully obtained short-term credentials.
Using an mutating webhook
Modifying the configuration for each workload can be time-consuming. AWS provides an open-source mutating webhoook: https://github.com/aws/amazon-eks-pod-identity-webhook that can be used to add the necessary information to each created Pod. If majority of your workloads require access to AWS resources it can be a quick solution. Workloads can use annotations to exclude themselves from being injected with addtional information. Disclaimer: I have not used this solution.
Manually generating keys.json
If you're running kubernetes 1.20.x the same repo provides information on how to generate the initial keys and keys.json file here.
Using Terraform to create the AWS Resources
Building all those resources manually can be daunting task. I use Terraform for a lot of my projects and this one wasn't an exception either.
OIDC setup
The setup consists of only a few resources: an S3 bucket to store the OIDC config, files uploaded into the bucket and the OIDC provider. I use a random string for the bucket name.
resource "random_string" "s3name" {
  length  = 32
  special = false
  upper   = false
  number  = false
}

locals {
    issuer_hostpath = "${random_string.s3name.id}.s3-ap-southeast-2.amazonaws.com"
}

resource "aws_s3_bucket" "oidc_bucket" {
  bucket = random_string.s3name.id
  website {
    index_document = "index.html"
    error_document = "error.html"
  }
}

resource "aws_s3_bucket_object" "openid_configuration" {
  bucket = aws_s3_bucket.oidc_bucket.id
  acl    = "public-read"
  key    = ".well-known/openid-configuration"
  content = templatefile("${path.module}/files/discovery.json.tpl", {
    issuer_hostpath = "https://${local.issuer_hostpath}"
  })
}

resource "aws_s3_bucket_object" "keys_json" {
  bucket = aws_s3_bucket.oidc_bucket.id
  acl    = "public-read"
  key    = "keys.json"
  source = "${path.module}/oidc/keys.json"
  etag   = filemd5("${path.module}/oidc/keys.json")
}
This is the content of the discovery.json.tpl file:
{
    "issuer": "${issuer_hostpath}/",
    "jwks_uri": "${issuer_hostpath}/keys.json",
    "authorization_endpoint": "urn:kubernetes:programmatic_authorization",
    "response_types_supported": [
        "id_token"
    ],
    "subject_types_supported": [
        "public"
    ],
    "id_token_signing_alg_values_supported": [
        "RS256"
    ],
    "claims_supported": [
        "sub",
        "iss"
    ]
}
keys.json can be obtained directly from the API or generated using the script above.
The OIDC provider setup:
data "tls_certificate" "s3oidc" {
  url = "https://${local.issuer_hostpath}"
}

resource "aws_iam_openid_connect_provider" "oidc_provider" {
  client_id_list  = ["cluster.identifier.kubernetes.domain"]
  thumbprint_list = [data.tls_certificate.s3oidc.certificates.0.sha1_fingerprint]
  url             = "https://${local.issuer_hostpath}"
}
Credits
Photo by Glenn Carstens-Peters on Unsplash